Getting Started with Hero
Do you need help installing or updating Hero?
If you’d like to start with some example content, here’s the content from the demo. Download and unzip the file. Then use the Tools → Import tool in your WordPress admin. Need step by step directions?
 In your WordPress admin, click on the “Theme Options” button located under the “Appearance” tab in the left menu. Here you can configure a number of options to tailor the theme to fit your needs.
General
Logo: Upload your own personal logo. If no logo is uploaded, your website’s name will be displayed in
plain text.
Favicon: Add your own favicon.
Custom CSS: Add your own custom styles.
Appearance
Colors: Here you can control the colors of vaious elements in the theme.
Fonts: Specify fonts from Google’s Web Font Directory for headings, body text, and home message. Be sure to type the font name exactly as it is listed on their site.
Home Page
Here you can control various aspects of the home page, including all of the settings for the home page banner.
Posts
Control what information is shown with posts and the size of the post’s featured image.
Note: You’ll also need to select the page you’ve chosen to display the blog posts. This is used to show the blog title at the top of your posts.
Footer
Enter text that will be displayed in the footer.
Integration
Add your analytics code.
Slideshow
Control the speed and the effect of the slideshows generated from the slideshow shortcode.
In your WordPress admin, click on “Menus”, which is located uner the “Appearance” tab on the left. Start by creaing a new menu in the panel on the right. Once the new menu is created you can add pages, categories, and custom links from the panels on the left. You can then re-order and create submenus by dragging the menu items. When you’re finished, click the “Save Menu” button.

This theme has several custom widgets and a number of widgetized areas in which you can use them. To add widgets, click on “Widgets” under the “Appearance” tab in your WordPress admin. Click and drag a widget to one of the boxes on the right. Then set your options for that widget.
Custom Widgets
Hero Recent Posts: Display a list of recent posts from a certain category or all categories, with the option to display an excerpt from the most recent post.
Hero Flickr: Show thumbnails for a Flickr account. Please note the Flickr widget uses your ID not your username. If you don’t know it, this will help: http://idgettr.com/
 By default, this theme will display your latest posts on the front page. To activate the home page as seen in the demo, first create a new page and name it something like “Home”. As you’re creating this page, select the “Home” page template in the Page Attributes box found in the right column. After you publish your page, go to Settings → Reading. For “Front page displays”, choose a static page and select your newly created “Home” page. Then save your settings.
Home Page Banner
This theme has a special home page parallax scrolling banner. You can set text, image, and background color for the banner in Appearance → Theme Options under the Home Page tab. There’s also a field for setting the vertical position of the text. This may need to be modified based on the height of your header.
Featured Pages
This section displays pages that you choose to feature on the home page. For each page, the featured image, title, and manual excerpt will be displayed. If the Excerpt field is not shown on the page edit screen, make sure it is checked under the Screen Options tab in the upper right.
If you’ve followed the steps above to set up your home page, you’ll probably want to display your posts on a different page. You can easily do this by creating a new page and giving it a name like “Blog”, “News”, or whatever you’d like to call it. After you publish your page, go to Settings → Reading. For “Front page displays”, choose your newly created “Blog” page for Posts page. Then save your settings.
 This theme uses a custom post type called “Projects” to help you manage your portfolio. To set up your portfolio page, create a new page and select the “Portfolio” page template. To add a new portfolio piece, select “Add New” under “Projects” in the left hand menu. Use the main text editor on the Project edit page to insert the main images or video for your project. Ideal image width is 950px, but if your images are larger they will be sized with the fluid layout.
Skills
 When creating a project, it’s important to assign it to a skill. Skills are categories for your projects and they are used to form the project filter navigation. You can find the “Skills” box in the right column.
Project Options
 Here you can set an external link to your project. For example, if your project is a website hosted elsewhere.
Home Feature Options
 Specify the project to be shown on the home page. This option is also available for pages.
Thumbnail Image
 To create the thumbnail for your project, use the “Featured Image” box found at the bottom of the right column. Use the popup window to upload an image, and then click “Use as featured image”. The image that you upload should be at least 300px by 175px.
You can add beautiful buttons to the content of any page, post, or widget using the following shortcode:
[ssc][button url="http://themetrust.com/" target="_blank" label="Learn More"][/ssc]
The button shortcode takes 3 parameters: url, target, and label.
This theme comes with a special slideshow built-in that scales with the fluid layout which is all part of the responsive design. All you have to do to turn a set of images in your content into a slideshow is wrap them in this shortcode:
[ssc][slideshow][/slideshow][/ssc]
See the example below:
[ssc][slideshow]
<img src="http://domain/imageurl-1.jpg" />
<img src="http://domain/imageurl-2.jpg" />
[/slideshow][/ssc]
It’s important to note that images in a slideshow can not be linked.
This theme comes with column shortcodes, which allows you to easily create columns within your content. You can create columns that are one third, two thirds, or one half of the content area’s width. Here’s an example. Notice the additon of “_last” to the name of the last column’s shorcode. This is important.
[ssc][one_third]

...your content here

[/one_third]

[one_third]

...your content here

[/one_third]

[one_third_last]

...your content here

[/one_third_last][/ssc]
Here are the available column shortcodes: one_third, two_third, one_half. Use these in the format demonstrated above.
You can add beautiful buttons to the content of any page, post, or widget using the following shortcode:
[ssc][button label="Launch Project" url="http://themetrust.com/hardy" color="#f05134" target="_blank" ptag=true][/ssc]
The button shortcode takes 5 parameters: url, target, label, ptag, and color.
Translating Your Theme with WPML
Basic Setup
Hero is WPML-compatible, meaning that all text in this theme can be translated to the language of your choice. To begin, be sure you have the WPML Plugin installed and activated, along with the WPML String Translation plugin.
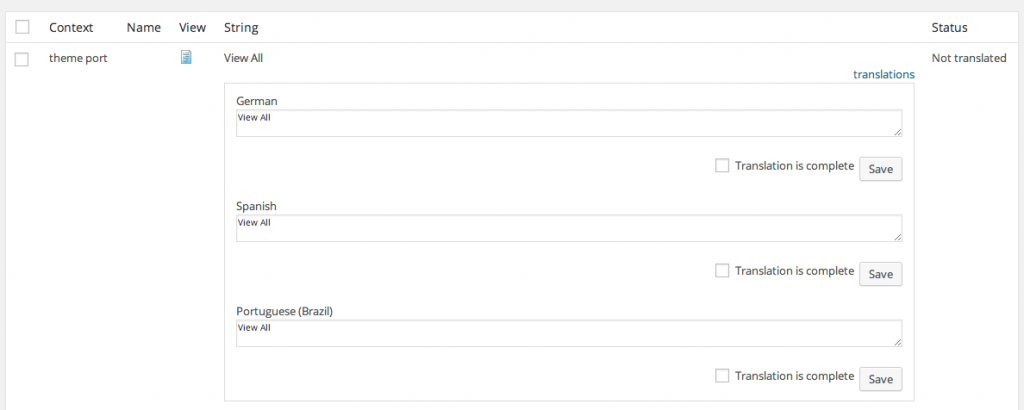
To set up WPML the first time, follow their Getting Started Guide.To begin translating, select WPML (in the Dashboard menu) -> String Translation. You should see a list of the strings in the theme (there should be only four), with blue translation links to the right. Click these links to reveal the list of languages you use on your blog and the associated translations.
Translating Projects, Skills and Testimonials
To translate the custom post types and taxonomies (projects, skills, and testimonials), go to WPML -> Translation Management. After, select Multilingual Content Management from the tabs.

Next, locate the section called Custom Posts (about halfway down). Here you can choose the translations for projects (and their slugs). Below this section, you can see Custom Taxonomies, where you can translate the skills taxonomy.
