Getting Started with Gear
Do you need help installing or updating Gear?
If you’d like to start with some example content, here’s the content from the demo. Download and unzip the file. Then use the Tools → Import tool in your WordPress admin. Need step by step directions?
You can upload your own logo image by opening up the Customizer under Appearance → Customize. Then click the Site Title & Tagline tab. There you will find the “Logo” image upload field.
Under this tab you will also find the Header Text field. This is a good place to display your company phone number or social links as seen in the demo.
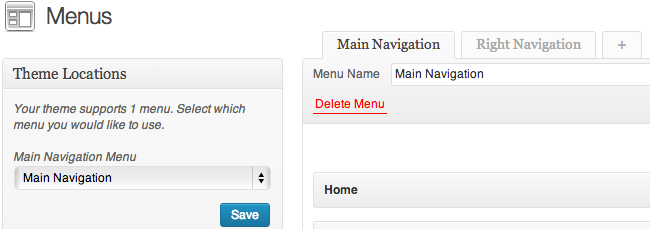
In your WordPress admin, click on “Menus”, which is located under the “Appearance” tab on the left. Start by creating a new menu in the panel on the right. Once the new menu is created you can add pages, categories, and custom links from the panels on the left. You can then re-order and create submenus by dragging the menu items. When you’re finished, click the “Save Menu” button.

Campaigns are a new post type you can use to highlight a particular type of product, a sale, or any other specialized store you might have. Each campaign is associated with an image, title and excerpt along with WooCommerce product tags. Examples campaigns could include a special Fall product line, clearance items, men’s or women’s wear, or new items in the store.
To create a new Campaign, go to Campaigns->Add New in your WordPress Dashboard.
To add an image for the campaign, click Add Featured Image.
In the top-right, the box Product Tags will accept a comma-separated list of the WooCommerce product tags you would like to feature. Note: This box will not appear if the WooCommerce plugin is not installed and activated
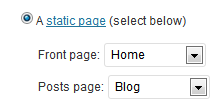
Gear comes with a homepage template designed to showcase your products and help convert visitors into customers. To set up the homepage, first create a new page and name it something like “Home”. As you’re creating this page, select the “Home” page template in the Page Attributes box found in the right column. After you publish your page, go to Settings → Reading. For “Front page displays”, choose a static page and select your newly created “Home” page, then save your settings.

The content of the homepage template is broken into sections. Below is an explanation of how you can customize each section.
Homepage Slideshow: You can add and manage slides under the “Slides” tab in the main WordPress admin menu. Each slide will display the content of that slide and the featured image as a background. The recommended image size for the featured image is: 1300px x 700px. These are not exact image size requirements, so feel free to experiment with different dimensions.
Static Content: Gear retrieves the static content for this page template from the page itself. If you wish to change what is shown here, simply go to Pages → [The “Home” page we created earlier] and edit the contents.
Campaigns and Shop: The home shop is a space for you to display select products and up to two Campaigns. You can change the settings for this section under Customize→Gear Homepage→Home Shop.
If you would like to show only one or no Campaigns in this space, simply leave one or both of the spaces blank.
Recent Posts: This section displays your recent posts. You can change the settings for this section under Customize→Gear Homepage→Recent Posts. The suggested size for the background image is 1300px x 700px. These are not exact image size requirements, so feel free to experiment with different dimensions.
To utilize the store features that are built into Gear, you will need to install a free plugin: WooCommerce. To do an automatic install of WooCommerce, log in to your WordPress admin panel, navigate to the Plugins menu and click Add New. In the search field type “WooCommerce” and click Search Plugins. Once you’ve found our eCommerce plugin you can view details about it such as the the point release, rating and description. Most importantly of course, you can install it by simply clicking Install Now. After clicking that link you will be asked if you’re sure you want to install the plugin. Click yes and WordPress will automatically complete the installation.
To view the extensive WooCommerce Codex, documentation and tips go to the WooCommerce Docs site.
We’re happy to help you in the support forum with basic questions about setting up your theme with WooCommerce. If you get stuck with WooCommerce itself, you can ask for help on the WooCommerce Community Forums
Adding Slideshows to Single Products
Image attachments are automatically setup as a slideshow. This means all you need to do is upload the images and save your changes – no shortcode is necessary.
Setting Number of Products on Store Page
To customize the number of products that appear in the store page, go to Settings > Reading and change the number for “Blog pages show at most”.
 If you’ve followed the steps above to set up your home page, you’ll probably want to display your posts on a different page. You can easily do this by creating a new page and giving it a name like “Blog”, “News”, or whatever you’d like to call it. After you publish your page, go to Settings → Reading. For “Front page displays”, choose your newly created “Blog” page for Posts page. Then save your settings.
